
Usually, many developers make use of stored procedures or SQL scripts to perform search which is kind of a common approach. It includes number of steps such as: writing a long stored procedure, placing a text box on your page that will enable a user to type a search term, execute the stored procedure on the search button click and passing the types parameter to the stored procedure and the results are displayed.
Many of you must be familiar with stores procedures like this (used for searching):
ALTER PROCEDURE [dbo].[spSearchRecords]
 -- Add the parameters for the stored procedure here
(
@firstName nvarchar(50) = null,
@lastName nvarchar(50) = null,
@email nvarchar(50) = null
)
AS
BEGIN
.....
...........
I am not saying that it is a bad approach nor denying the fact that it does not work. I think it is a great way to search records in ASP.NET and in fact I have used this technique myself many times in several past projects (it always worked).
But, today we have so many latest / fast / different ways to perform the same task in much less time or effort and in this article I am going to explain a great way to search records on client-side just by using jQuery and css stylesheets (without using stored procedures or SQL script).
Step 1:
Let us create a sample table as “StudentTable” and fill in some sample data
CREATE TABLE [dbo].[StudentTable](
    [StudentID] [int] IDENTITY(1,1) NOT NULL,
    [FirstName] [nvarchar](50) NULL,
    [LastName] [nvarchar](50) NULL,
    [Address] [nvarchar](50) NULL,
    [City] [nvarchar](50) NULL,
    [State] [nvarchar](50) NULL,
    [AdmissionDate] [datetime] NULL,
 CONSTRAINT [PK_StudentTable] PRIMARY KEY CLUSTERED
(
    [StudentID] ASC
)WITH (PAD_INDEX  = OFF, STATISTICS_NORECOMPUTE  = OFF, IGNORE_DUP_KEY = OFF, ALLOW_ROW_LOCKS  = ON, ALLOW_PAGE_LOCKS  = ON) ON [PRIMARY]
) ON [PRIMARY]
Step 2:
Let us create a Master page and right after the <title> tag and within <head> tag, we will link our css stylesheets like this:
<%@ Master Language="C#" AutoEventWireup="true" CodeBehind="Site.master.cs" Inherits="SearchRecords.SiteMaster" %>

<!DOCTYPE html>
<html lang="en">
<head runat="server">
    <meta charset="utf-8" />
    <title><%: Page.Title %> - My ASP.NET Application</title>
    <link href="~/Content/Site.css" rel="stylesheet" />
    <link href="favicon.ico" rel="shortcut icon" type="image/x-icon" />


    <!--START HERE -->
     <link href="css/bootstrap-responsive.css" rel="stylesheet">
    <link href="css/charisma-app.css" rel="stylesheet">
    <link href="css/jquery-ui-1.8.21.custom.css" rel="stylesheet">
    <link href='css/fullcalendar.css' rel='stylesheet'>
    <link href='css/fullcalendar.print.css' rel='stylesheet' media='print'>
    <link href='css/chosen.css' rel='stylesheet'>
    <link href='css/uniform.default.css' rel='stylesheet'>
    <link href='css/colorbox.css' rel='stylesheet'>
    <link href='css/jquery.cleditor.css' rel='stylesheet'>
    <link href='css/jquery.noty.css' rel='stylesheet'>
    <link href='css/noty_theme_default.css' rel='stylesheet'>
    <link href='css/elfinder.min.css' rel='stylesheet'>
    <link href='css/elfinder.theme.css' rel='stylesheet'>
    <link href='css/jquery.iphone.toggle.css' rel='stylesheet'>
    <link href='css/opa-icons.css' rel='stylesheet'>
    <link href='css/uploadify.css' rel='stylesheet'>
    <!--END HERE -->

    <asp:PlaceHolder runat="server">
        <script src="<%: ResolveUrl("~/Scripts/modernizr-2.5.3.js") %>"></script>
    </asp:PlaceHolder>
    <meta name="viewport" content="width=device-width" />
    <asp:ContentPlaceHolder runat="server" ID="HeadContent" />
</head>
<body>
Step 3:
Now we will link our jQuery in the same master page but after </form> tag and before </body> tag like this:
</form>

         <!-- external javascript
    ================================================== -->
    <!-- Placed at the end of the document so the pages load faster -->
    <!-- jQuery -->
    <script src="js/jquery-1.7.2.min.js"></script>
    <!-- jQuery UI -->
    <script src="js/jquery-ui-1.8.21.custom.min.js"></script>
    <!-- transition / effect library -->
    <script src="js/bootstrap-transition.js"></script>
    <!-- alert enhancer library -->
    <script src="js/bootstrap-alert.js"></script>
    <!-- modal / dialog library -->
    <script src="js/bootstrap-modal.js"></script>
    <!-- custom dropdown library -->
    <script src="js/bootstrap-dropdown.js"></script>
    <!-- scrolspy library -->
    <script src="js/bootstrap-scrollspy.js"></script>
    <!-- library for creating tabs -->
    <script src="js/bootstrap-tab.js"></script>
    <!-- library for advanced tooltip -->
    <script src="js/bootstrap-tooltip.js"></script>
    <!-- popover effect library -->
    <script src="js/bootstrap-popover.js"></script>
    <!-- button enhancer library -->
    <script src="js/bootstrap-button.js"></script>
    <!-- accordion library (optional, not used in demo) -->
    <script src="js/bootstrap-collapse.js"></script>
    <!-- carousel slideshow library (optional, not used in demo) -->
    <script src="js/bootstrap-carousel.js"></script>
    <!-- autocomplete library -->
    <script src="js/bootstrap-typeahead.js"></script>
    <!-- tour library -->
    <script src="js/bootstrap-tour.js"></script>
    <!-- library for cookie management -->
    <script src="js/jquery.cookie.js"></script>
    <!-- calander plugin -->
    <script src='js/fullcalendar.min.js'></script>
    <!-- data table plugin -->
    <script src='js/jquery.dataTables.min.js'></script>
    <!-- chart libraries start -->
    <script src="js/excanvas.js"></script>
    <script src="js/jquery.flot.min.js"></script>
    <script src="js/jquery.flot.pie.min.js"></script>
    <script src="js/jquery.flot.stack.js"></script>
    <script src="js/jquery.flot.resize.min.js"></script>
    <!-- chart libraries end -->
    <!-- select or dropdown enhancer -->
    <script src="js/jquery.chosen.min.js"></script>
    <!-- checkbox, radio, and file input styler -->
    <script src="js/jquery.uniform.min.js"></script>
    <!-- plugin for gallery image view -->
    <script src="js/jquery.colorbox.min.js"></script>
    <!-- rich text editor library -->
    <script src="js/jquery.cleditor.min.js"></script>
    <!-- notification plugin -->
    <script src="js/jquery.noty.js"></script>
    <!-- file manager library -->
    <script src="js/jquery.elfinder.min.js"></script>
    <!-- star rating plugin -->
    <script src="js/jquery.raty.min.js"></script>
    <!-- for iOS style toggle switch -->
    <script src="js/jquery.iphone.toggle.js"></script>
    <!-- autogrowing textarea plugin -->
    <script src="js/jquery.autogrow-textarea.js"></script>
    <!-- multiple file upload plugin -->
    <script src="js/jquery.uploadify-3.1.min.js"></script>
    <!-- history.js for cross-browser state change on ajax -->
    <script src="js/jquery.history.js"></script>
    <!-- application script for Charisma demo -->
    <script src="js/charisma.js"></script>

</body>
</html>
Step 4:
Now we will create a page “Default.aspx” that will be using our master page and on this page, we will place our gridview like this:
<asp:Content runat="server" ID="BodyContent" ContentPlaceHolderID="MainContent">


      <link id="bs-css" href="css/bootstrap-cerulean.css" rel="stylesheet">
    <script src="Scripts/JavaScript1.js"></script>
    <link href="Scripts/StyleSheet1.css" rel="stylesheet" />


    <div>

                       <asp:GridView ID="gvStudents" runat="server" EmptyDataText="Sorry no data availabe to show!" CssClass="table table-striped table-bordered bootstrap-datatable datatable"
                    GridLines="None" Width="100%" AutoGenerateColumns="False" >
 <Columns>

       <asp:BoundField DataField="FirstName" HeaderText="FirstName"  />
                <asp:BoundField DataField="LastName" HeaderText="LastName"  />
                <asp:BoundField DataField="Address" HeaderText="Address"  />
                <asp:BoundField DataField="City" HeaderText="City"  />
                <asp:BoundField DataField="State" HeaderText="State"  />
                <asp:BoundField DataField="AdmissionDate" HeaderText="AdmissionDate" dataformatstring="{0:MM/dd/yyyy}" />


     </Columns>
                    <RowStyle CssClass="cursor-pointer" />


        </asp:GridView>

    </div>
</asp:Content>
Step 5:
Now we will bind our gridview to get data from our StudentTable – Here is the code behind:
using System;
using System.Collections.Generic;
using System.Configuration;
using System.Data;
using System.Data.SqlClient;
using System.Linq;
using System.Web;
using System.Web.UI;
using System.Web.UI.WebControls;

namespace SearchRecords
{
    public partial class _Default : Page
    {
        protected void Page_Load(object sender, EventArgs e)
        {
            if (!IsPostBack)
            {
                BindStudents();
            }
        }

        private void BindStudents()
        {

            //Striving Programmers

            SqlConnection con = new SqlConnection(ConfigurationManager.ConnectionStrings["DefaultConnection"].ConnectionString);

            SqlCommand cmd = new SqlCommand("Select * from StudentTable", con);

            SqlDataAdapter da = new SqlDataAdapter(cmd);

            DataSet ds = new DataSet();
            da.Fill(ds);


            gvStudents.DataSource = ds.Tables[0];
            gvStudents.DataBind();
            gvStudents.UseAccessibleHeader = true;

            if (gvStudents.HeaderRow != null)
                gvStudents.HeaderRow.TableSection = TableRowSection.TableHeader;
            //Striving Programmers
        }
    }
}
Step 6:
That’s all – We are done! The jQuery and css stylesheets will do the job now.
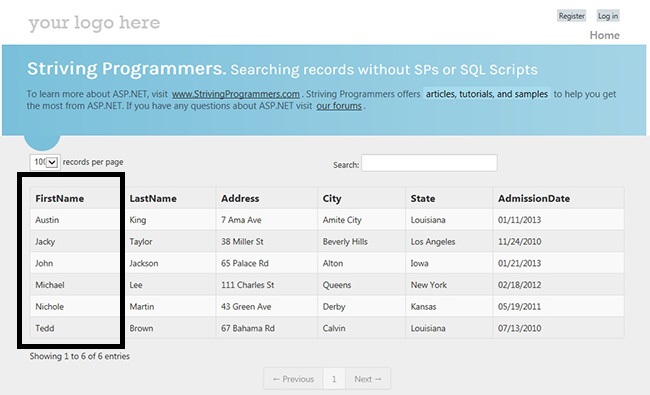
The complete page will look like this:

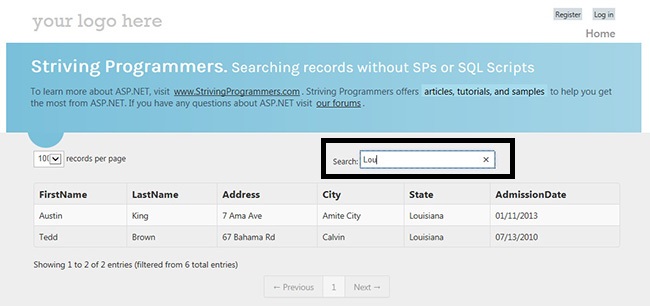
Here are the search results:
Here is the sorting:
To edit page size (records per page), look into: jquery.dataTables.min.js
Look for “iDisplayLength:10000” -> In this example, it is set to 10000 records per page
To edit display records per page (based on selection from dropdown), look into: jquery.dataTables.min.js
Look for “aLengthMenu:[10000,20000]” –> In this example, it is set to 10000, 20000 records per page
Points to remember (features):
1) By this, the gridview gets a client-side search functionality (by default the search is applied to all the columns visible in the gridview)
2) By this, the gridview gets the sorting feature (just click the column header and sorting will work)
3) By this, you get paging feature for your gridview
4) No minimum search term or minimum characters required
5) No button click event required – The searching works as you type / enter the search term
I am attaching the complete project (source code) for you (In Visual Studio 2012):
The required jQuery and CSS folders are inside the project.
(P.S: You will have to create your own database and StudentTable with some sample data in it)

